

Kubernetes Under the Hood — Internal Mechanisms and Networking
Building on the foundational architecture explored in Kubernetes Foundations — Architecture and Core Components, we now dive into the internal mechanisms and networking that power Kubernetes’ orchestration capabilities. For DevOps engineers, ML engineers, and architects, understanding how Kubernetes operates behind the scenes is key to leveraging its full potential. We examine the API call flow, watch-loops, and scheduling processes that drive cluster operations, alongside the networking configurations—such as CNI plugins—that enable seamless connectivity within and beyond the cluster.
Kubernetes orchestrates cluster operations through a streamlined API call flow, ensuring seamless deployment and management of resources. When a user initiates a request via kubectl—such as creating a new Deployment—the process unfolds as follows.
API Call Flow
The API call flow in Kubernetes coordinates cluster operations via interactions between kubectl, kube-apiserver, and other components.
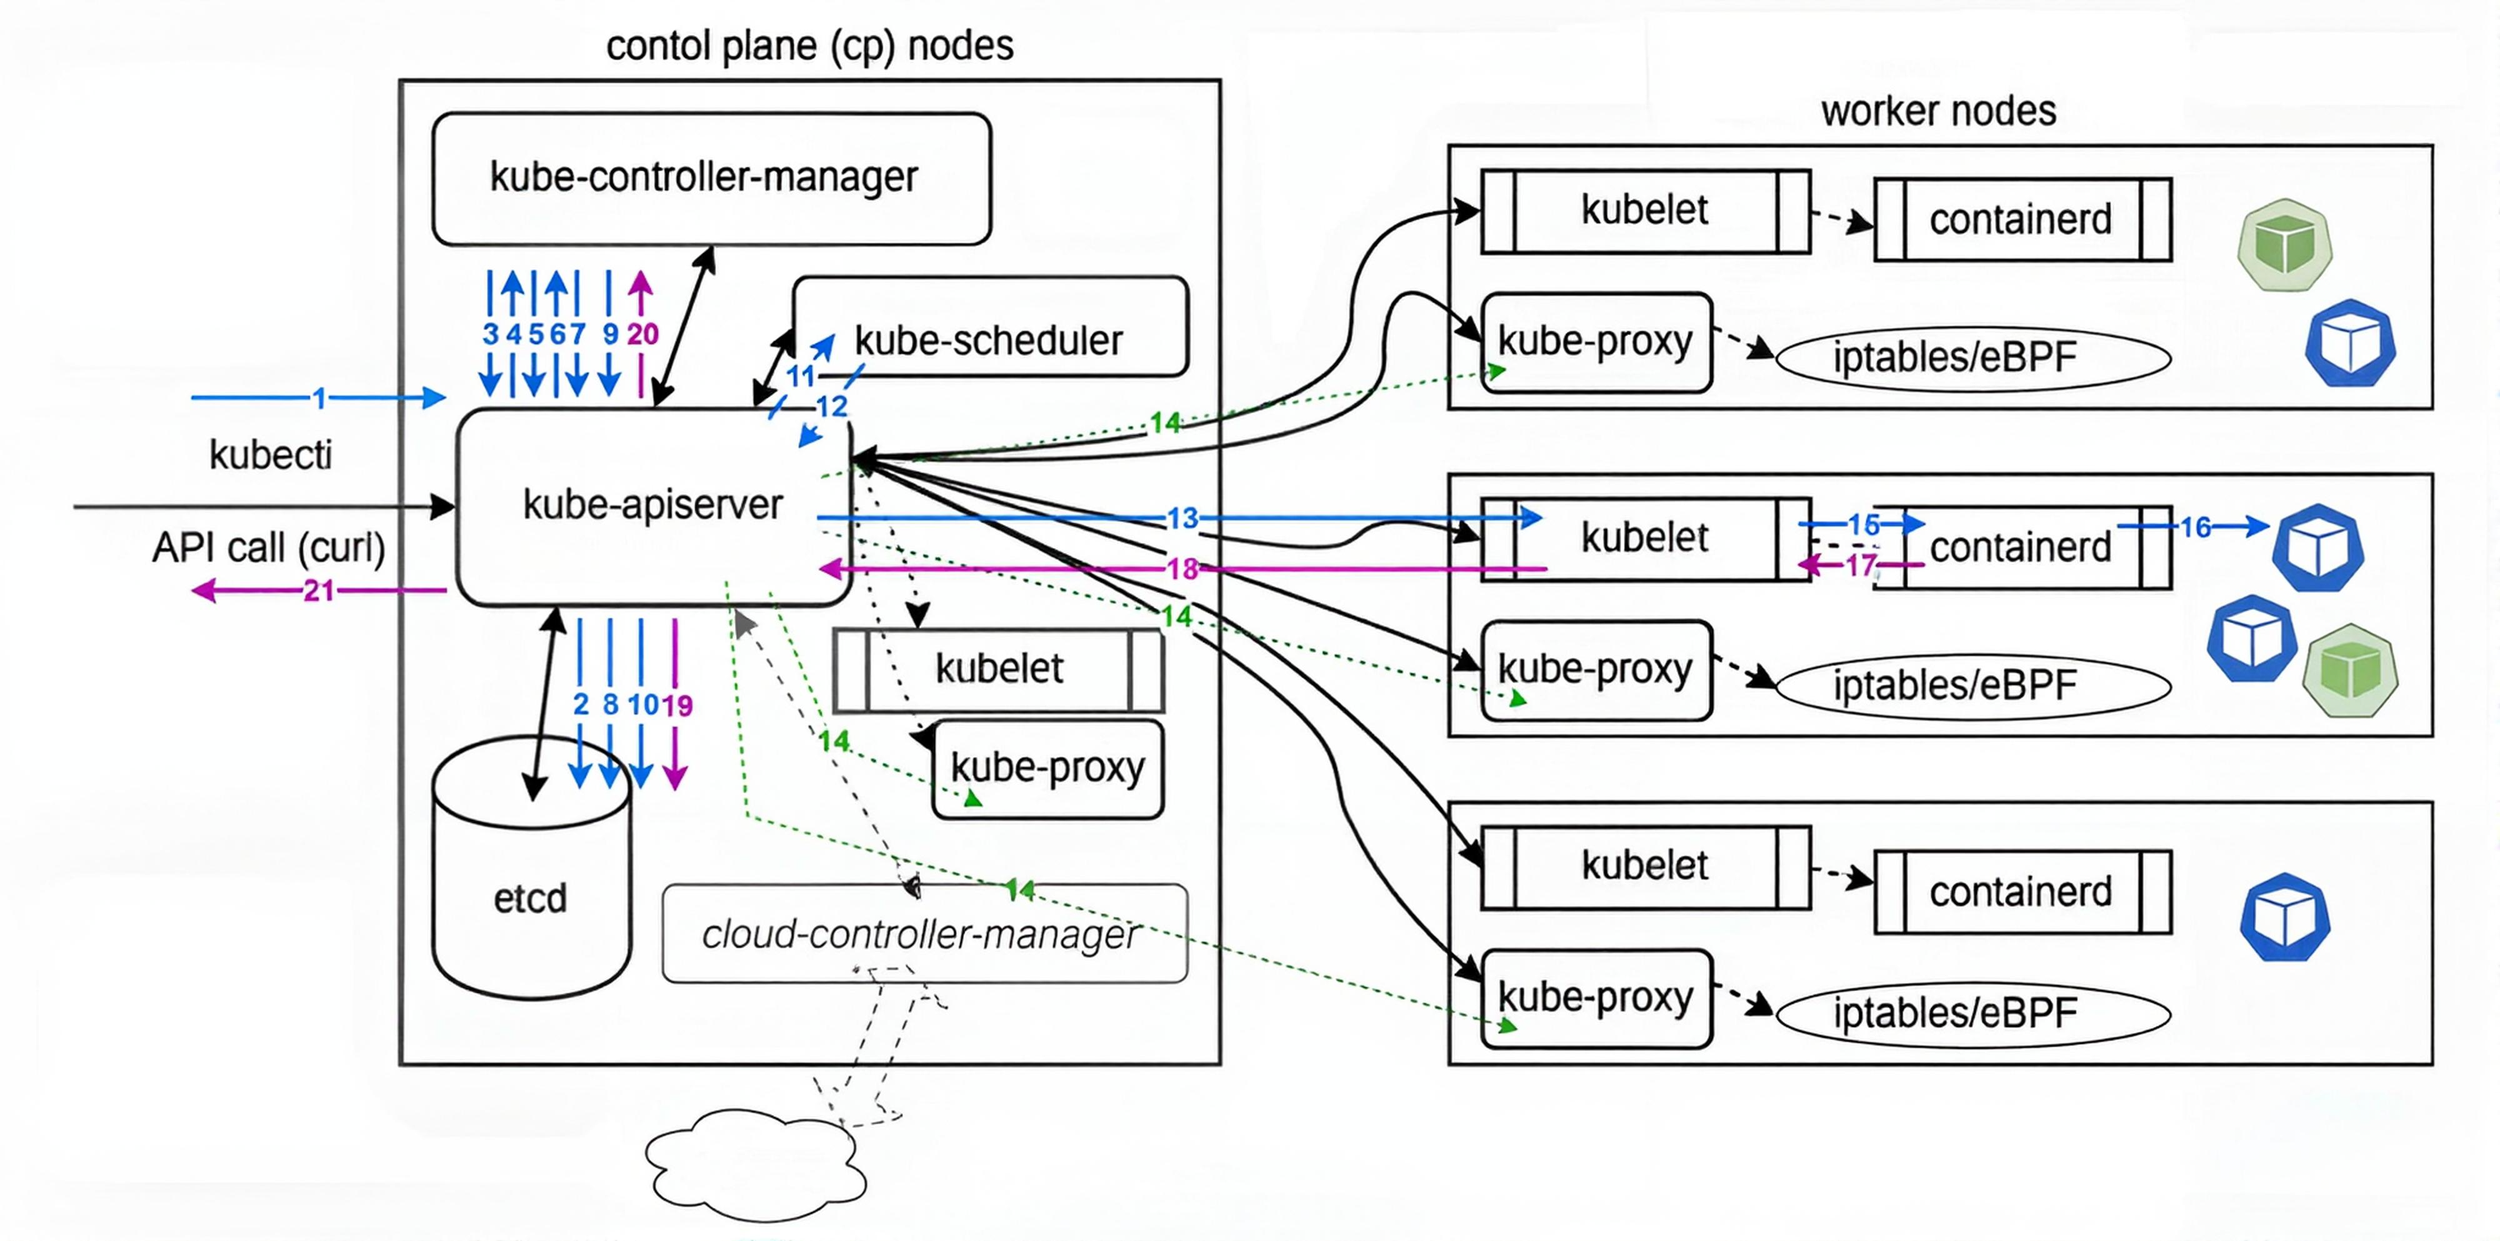
1: Request comes from kubectl to kube-apiserver, creating a new Deployment.
2: Kube-apiserver persists the data in its memory and sends it to etcd, where it is stored.
3: Kube-controller-manager requests kube-apiserver to check if the specification has changed.
4: If the specification has changed, kube-apiserver responds: 'Here is the new specification.'
5: Kube-controller-manager receives the new specification: Does it exist? Does its status match the request?
6: Kube-controller-manager responds: 'It does not exist; create it.'
7: A new Deployment is created.
8: Data about the new Deployment is persisted in etcd.
9: ReplicaSet asks how many Pods need to be created.
10: Saves the ReplicaSet count in etcd.
11: Kube-apiserver asks kube-scheduler which available worker node should receive the Pod specification.
12: Kube-scheduler responds to kube-apiserver with which node the Pod should run on.
13: Kube-apiserver sends the information to the chosen node’s kubelet.
14: Networking configuration updates are sent to each kube-proxy, ensuring awareness of the new setup, often using ipvs or eBPF with plugins like Cilium.
15: Kubelet handles downloading all ConfigMaps and Secrets, and mounting filesystems, then sends the Pod specification to the container runtime (typically containerd).
16: The runtime creates the Pod, followed by the container. Kubernetes tracks the Pod, not the containers themselves.
17: Kube-apiserver responds to kubectl about the created Pod.
18: Kubelet responds to kube-apiserver with information about the created Pod.
19: Saves the information in etcd about the created Pod.
20: Saves information in kube-controller-manager that the new Deployment and Pod exist.
21: Kube-apiserver responds to kubectl with information about the created Deployment.
Managing State with Deployments
The default controller for a container deployed via kubectl run command is a Deployment. While we have been working with them already, we will take a closer look at configuration options. As with other objects, a Deployment can be made from a YAML or JSON spec file. When added to the cluster, the controller will create a ReplicaSet and a Pod automatically. The containers, their settings, and applications can be modified via an update, which generates a new ReplicaSet, which, in turn, generates new Pods.
The updated objects can be staged to replace previous objects as a block or as a rolling update, which is determined as part of the Deployment specification. Most updates can be configured by editing a YAML file and running kubectl apply. You can also use kubectl edit to modify the in-use configuration. Previous versions of the ReplicaSets are kept, allowing a rollback to return to a previous configuration.
We will also talk more about labels. Labels are essential to administration in Kubernetes, but are not an API resource. They are user-defined key-value pairs which can be attached to any resource, and are stored in the metadata. Labels are used to query or select resources in your cluster, allowing for flexible and complex management of the cluster. As a label is arbitrary, you could select all resources used by developers, or belonging to a user, or any attached string, without having to figure out what kind or how many of such resources exist.
ReplicationControllers (RC) ensure that a specified number of Pod replicas is running at any one time. ReplicationControllers also give you the ability to perform rolling updates. However, those updates are managed on the client side. This is problematic if the client loses connectivity, and can leave the cluster in an unplanned state. To avoid problems when scaling the ReplicationControllers on the client side, a new resource was introduced in the apps/v1 API group: Deployments. Deployments allow server-side updates to Pods at a specified rate. They are used for canary and other deployment patterns.
Using DaemonSets
A newer object to work with is the DaemonSet. This controller ensures that a single Pod exists on each node in the cluster. Every Pod uses the same image. Should a new node be added, the DaemonSet controller will deploy a new Pod on your behalf. Should a node be removed, the controller will delete the Pod also. The use of a DaemonSet allows for ensuring a particular container is always running. In a large and dynamic environment, it can be helpful to have a logging or metric generation application on every node without an administrator remembering to deploy that application. Use kind: DaemonSet. There are ways of affecting the kube-scheduler such that some nodes will not run a DaemonSet.
Object Relationship
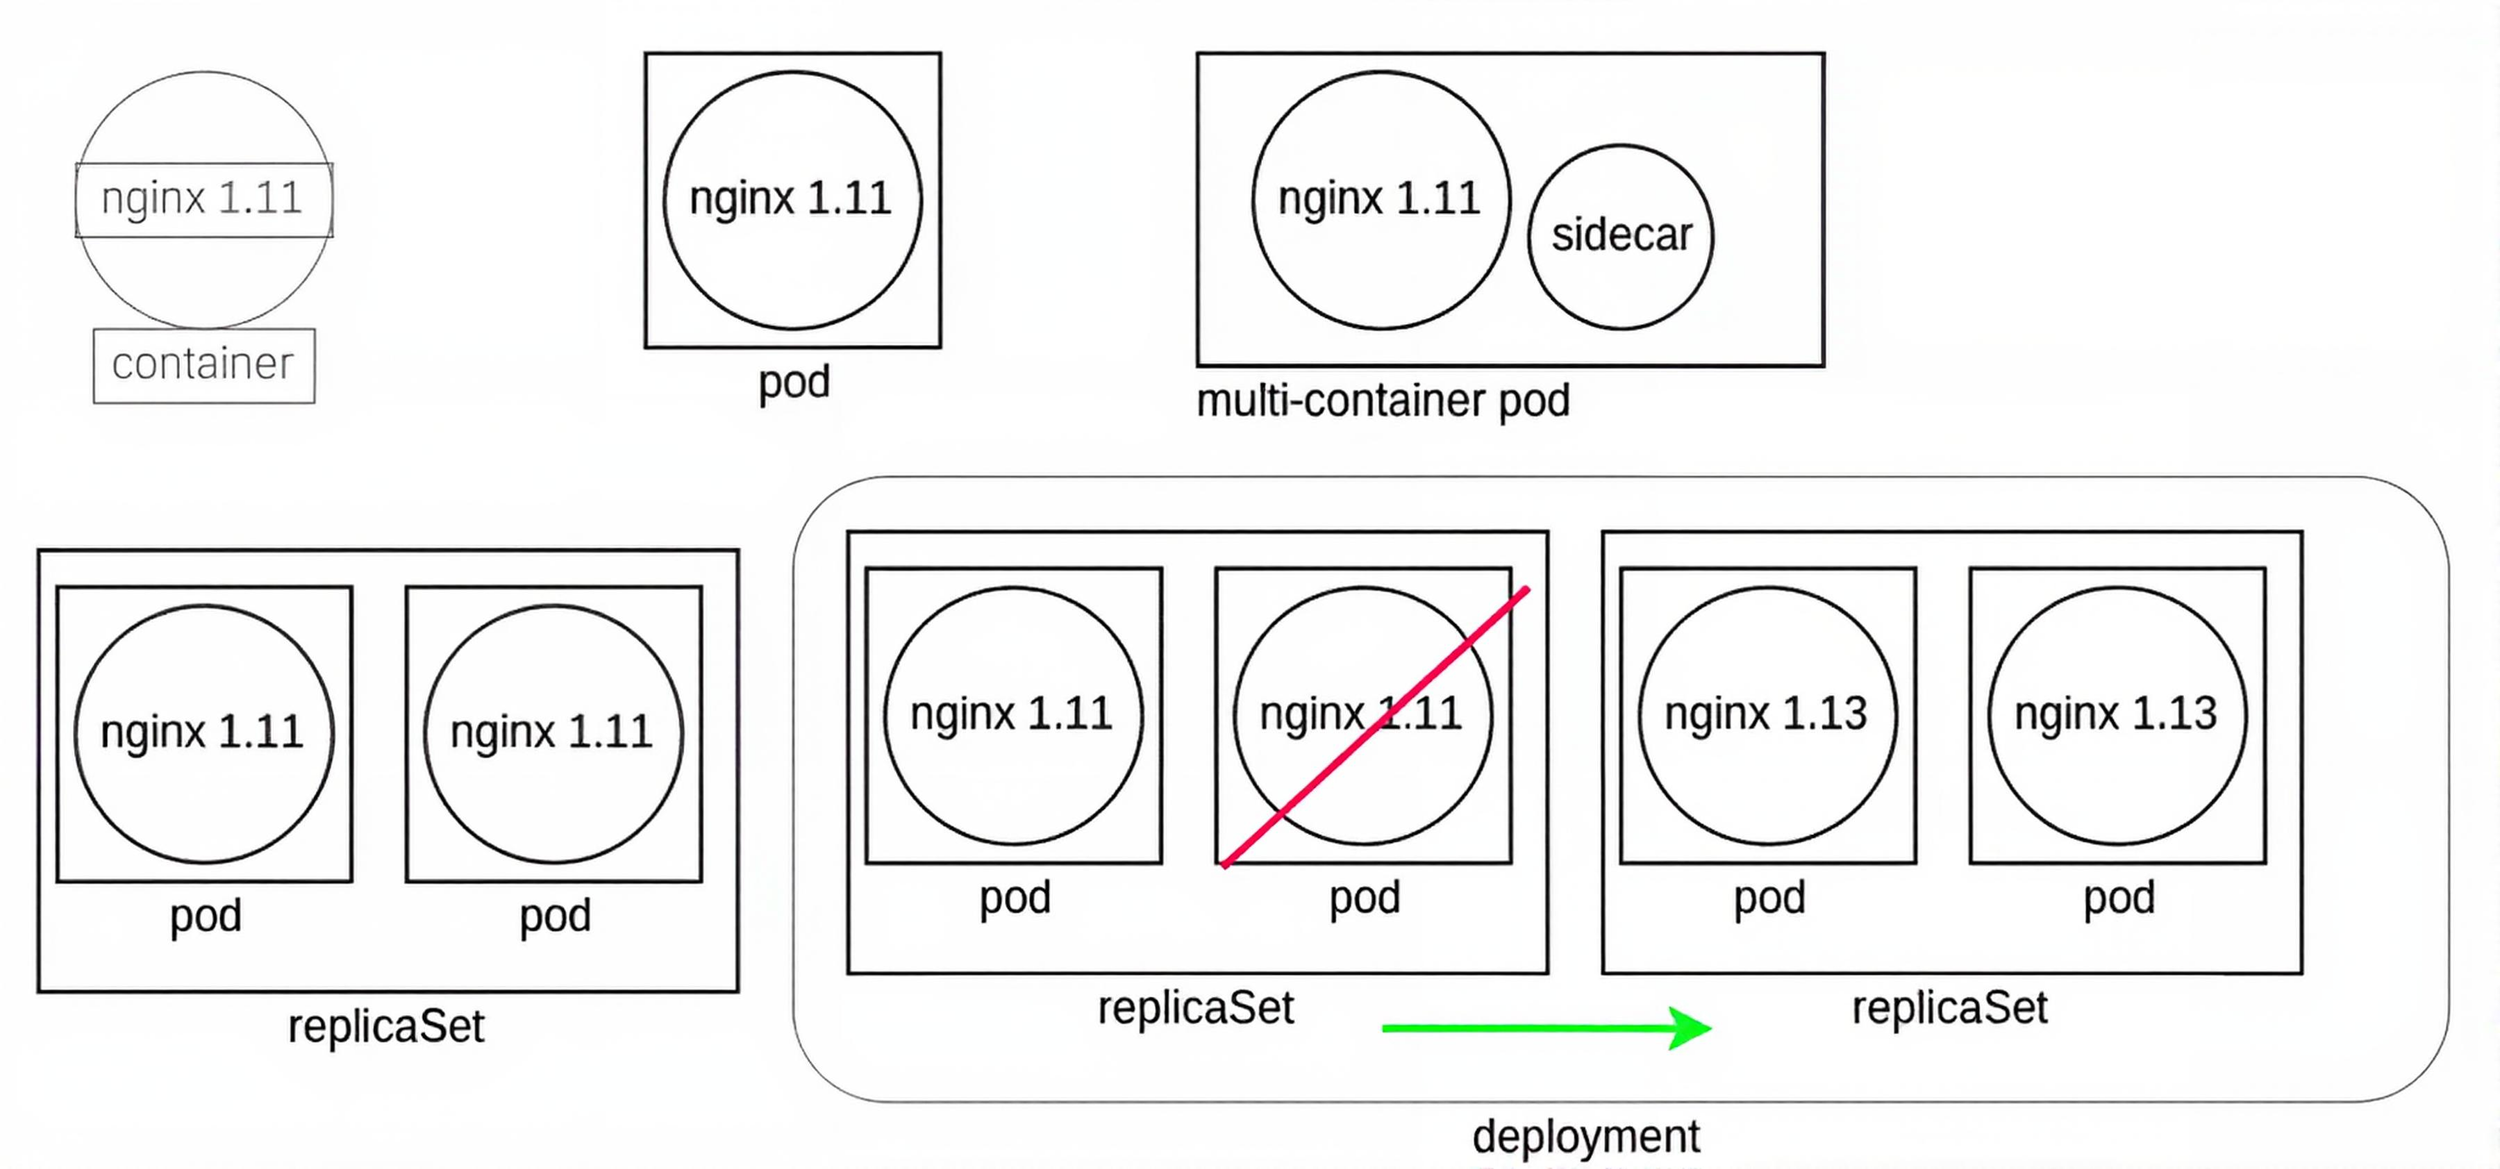
Here you can see the relationship between objects from the container, which Kubernetes does not directly manage, up to the Deployment.
Nested Objects
The graphic in the upper left represents a container running nginx 1.11. Kubernetes does not directly manage the container. Instead, the kubelet daemon checks the PodSpec by asking the container runtime, which could be cri-o, for the current status. The graphic to the right of the container shows a Pod which represents a watch loop checking the container status. Kubelet compares the current PodSpec against what the container runtime replies and will terminate and restart the Pod if necessary.
A multi-container Pod is shown next. While there are several names used, such as sidecar or ambassador, these are all multi-container Pods. These terms indicate the particular reason to have a second container in the Pod, such as logging or proxying, instead of denoting a new kind of Pod.
On the lower left we see a ReplicaSet. This controller will ensure you have a certain number of Pods running. The Pods are all deployed with the same PodSpec, which is why they are called replicas. Should a Pod terminate or a new Pod be found, the ReplicaSet will create or terminate Pods until the current number of running Pods matches the specifications. Any of the current Pods could be terminated should the spec demand fewer Pods running.
The graphic in the lower right shows a Deployment. This controller allows us to manage the versions of images deployed in the Pods. Should an edit be made to the Deployment, a new ReplicaSet is created, which will deploy Pods using the new PodSpec. The Deployment will then direct the old ReplicaSet to shut down Pods as the new ReplicaSet Pods become available. Once the old Pods are all terminated, the Deployment terminates the old ReplicaSet and the Deployment returns to having only one ReplicaSet running.
Namespaces
The term namespace is used to reference both the kernel feature and the segregation of API objects by Kubernetes. Both are means to keep resources distinct. Every API call includes a namespace, using default if not otherwise declared:
https://10.128.0.3:6443/api/v1/namespaces/default/pods
Namespaces, a Linux kernel feature that segregates system resources, are intended to isolate multiple groups and the resources they have access to work with via quotas. Eventually, access control policies will work on namespace boundaries, as well. One could use labels to group resources for administrative reasons.
There are four namespaces when a cluster is first created:
default: This is where all the resources are assumed, unless set otherwise.
kube-node-lease: This is a namespace where worker node lease information is kept.
kube-public: A namespace readable by all, even those not authenticated. General information is often included in this namespace.
kube-system: This namespace contains infrastructure pods.
Should you want to see all the resources on a system, you must pass the --all-namespaces option to the kubectl command.
API Resources with kubectl
| Table: List of API Resources | ||
|---|---|---|
| all | events (ev) | podsecuritypolicies (psp) |
| certificatesigningrequests (csr) | horizontalpodautoscalers (hpa) | podtemplates |
| clusterrolebindings | ingresses (ing) | replicasets (rs) |
| clusterroles | jobs | replicationcontrollers (rc) |
| clusters (valid only for federation apiservers) | limitranges (limits) | resourcequotas (quota) |
| componentstatuses (cs) | namespaces (ns) | rolebindings |
| configmaps (cm) | networkpolicies (netpol) | roles |
| controllerrevisions | nodes (no) | secrets |
| cronjobs | persistentvolumeclaims (pvc) | serviceaccounts (sa) |
| customresourcedefinition (crd) | persistentvolumes (pv) | services (svc) |
| daemonsets (ds) | poddisruptionbudgets (pdb) | statefulsets |
| deployments (deploy) | podpreset | storageclasses |
| endpoints (ep) | pods (po) | |
Scheduling
The kube-scheduler assigns Pods to worker nodes based on resource availability and constraints.
Kubernetes schedules Pods to worker nodes using kube-scheduler, which employs an algorithm to evaluate resource availability—such as volumes, CPU, and memory—and constraints like quota restrictions, taints, tolerations, labels, and node metadata. The scheduler attempts to deploy the Pod, retrying if needed, until a suitable node is found or the Pod remains pending due to unmet conditions. Administrators can influence this process by binding a Pod to a specific node, using a custom scheduler, or configuring scheduling policies. Scheduler Profiles, the standard mechanism for customizing scheduling since Kubernetes 1.18 (2020), allow multiple schedulers with tailored configurations.
For example:
apiVersion: kubescheduler.config.k8s.io/v1
kind: KubeSchedulerConfiguration
profiles:
  - schedulerName: custom-scheduler
    plugins:
      score:
        enabled:
          - name: NodeResourcesBalancedAllocation
            weight: 2
Scheduling decisions are often specified in the PodSpec. The nodeName and nodeSelector fields assign a Pod to a specific node or a group matching particular labels, such as net: fast. NodeAffinity, a more advanced mechanism, has largely superseded nodeSelector, supporting rules like requiredDuringSchedulingIgnoredDuringExecution (enforcing mandatory node matches) or preferredDuringSchedulingIgnoredDuringExecution (prioritizing preferred nodes).
Pod affinity and anti-affinity rules, using operators like In or NotIn, co-locate or separate Pods based on labels—for example, requiring Pods with security: S1 to run together. Taints and tolerations further refine scheduling by restricting Pods from nodes unless they have matching tolerations, such as bypassing restrictions on control plane nodes.
Watch-loops
Watch-loops in Kubernetes ensure resources match their desired states by continuously monitoring and adjusting cluster objects.
Kubernetes orchestration relies on watch-loops, also known as controllers or operators, which continuously monitor and adjust cluster resources to match desired states. Various operators are built into Kubernetes, such as those for endpoints, namespaces, and service accounts, while custom operators can be created as needed. At their core, operators function as an informer mechanism paired with a downstream store, using a DeltaFIFO queue to compare the source state with the target state. A loop process receives an object—an array of deltas from the queue—and, if the delta is not of type Deleted, the operator’s logic modifies or creates the object until it aligns with the specification.
The informer mechanism queries the API server for an object’s state, caching the data to minimize transactions, while the SharedInformer creates a shared cache for objects accessed by multiple entities. A Workqueue distributes tasks to workers using standard work queues from the Go programming language (Golang), including rate-limiting, delayed, and time-based queues. For instance, Deployments manage ReplicaSets, which in turn oversee Pods running the same PodSpec, known as replicas, ensuring the desired number of Pods are operational.
Pod Network
Network plugins in Kubernetes enable Pod communication using the Container Network Interface (CNI) standard.
Prior to initializing the Kubernetes cluster, the network must be considered and IP conflicts avoided. There are several Pod networking choices, in varying levels of development and feature set. Many of the projects will mention the Container Network Interface (CNI), which is a CNCF project.
Calico
A flat Layer 3 network which communicates without IP encapsulation, used in production with software such as Kubernetes, OpenShift, Docker, Mesos and OpenStack. Viewed as a simple and flexible networking model, it scales well for large environments.
Flannel
A Layer 3 IPv4 network between the nodes of a cluster. Developed by CoreOS, it has a long history with Kubernetes. Focused on traffic between hosts, not how containers configure local networking, it can use one of several backend mechanisms, such as VXLAN. A flanneld agent on each node allocates subnet leases for the host.
Cilium
This is a newer but incredibly powerful network plugin which is used by major cloud providers. Via the use of eBPF and other features, this network plugin has become so powerful it is considered a service mesh.
Single IP per Pod
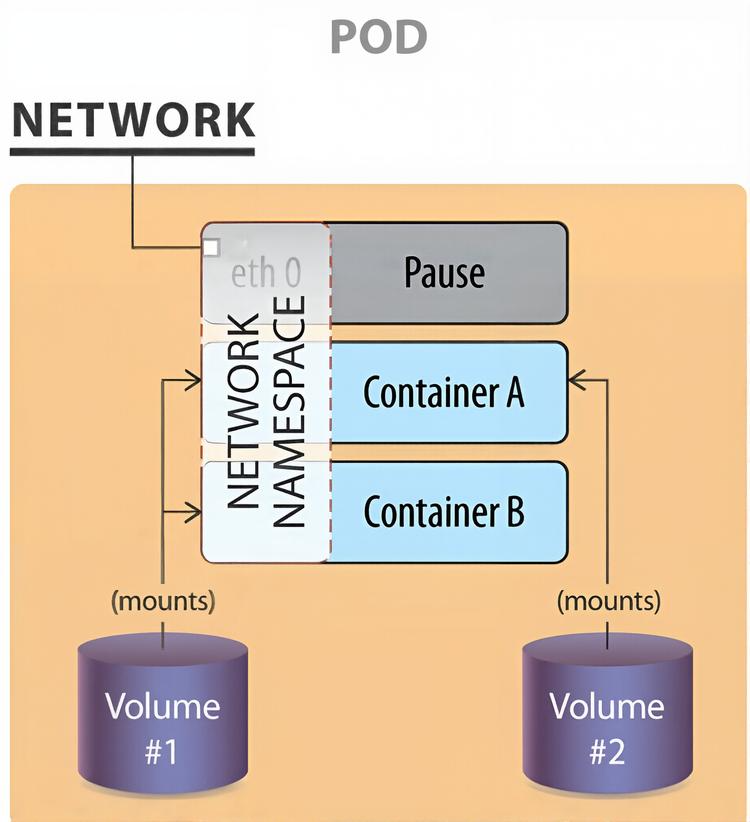
A pod represents a group of co-located containers with some associated data volumes. All containers in a pod share the same network namespace.
The graphic shows a pod with two containers, A and B, and two data volumes, 1 and 2. Containers A and B share the network namespace of a third container, known as the pause container. The pause container is used to get an IP address, then all the containers in the pod will use its network namespace. Volumes 1 and 2 are shown for completeness.
To communicate with each other, containers within pods can use the loopback interface, write to files on a common filesystem, or via inter-process communication (IPC). A network plugin from HPE Labs allows multiple IP addresses per pod, but this feature remains experimental and has not gained widespread adoption.
Kubernetes supports dual-stack networking, allowing Pods and Services to use both IPv4 and IPv6 addresses simultaneously. Stable support for dual-stack networking has been available since Kubernetes 1.23 (December 2021), enabling a single Service to handle both address families.
For example:
apiVersion: v1
kind: Service
metadata:
  name: my-service
spec:
  ipFamilies: [IPv4, IPv6]
  selector:
    app: my-app
  ports:
  - port: 80
This configuration simplifies network setup for modern clusters, supporting diverse environments.
Container and Service Networking
Container Networking

Within a Pod, containers share the same network namespace and IP address. This IP, assigned by the CNI plugin before containers start, is inserted into the containers. Depending on the CNI plugin, containers may have an interface like eth0@tun10. This IP remains fixed for the Pod’s lifetime.
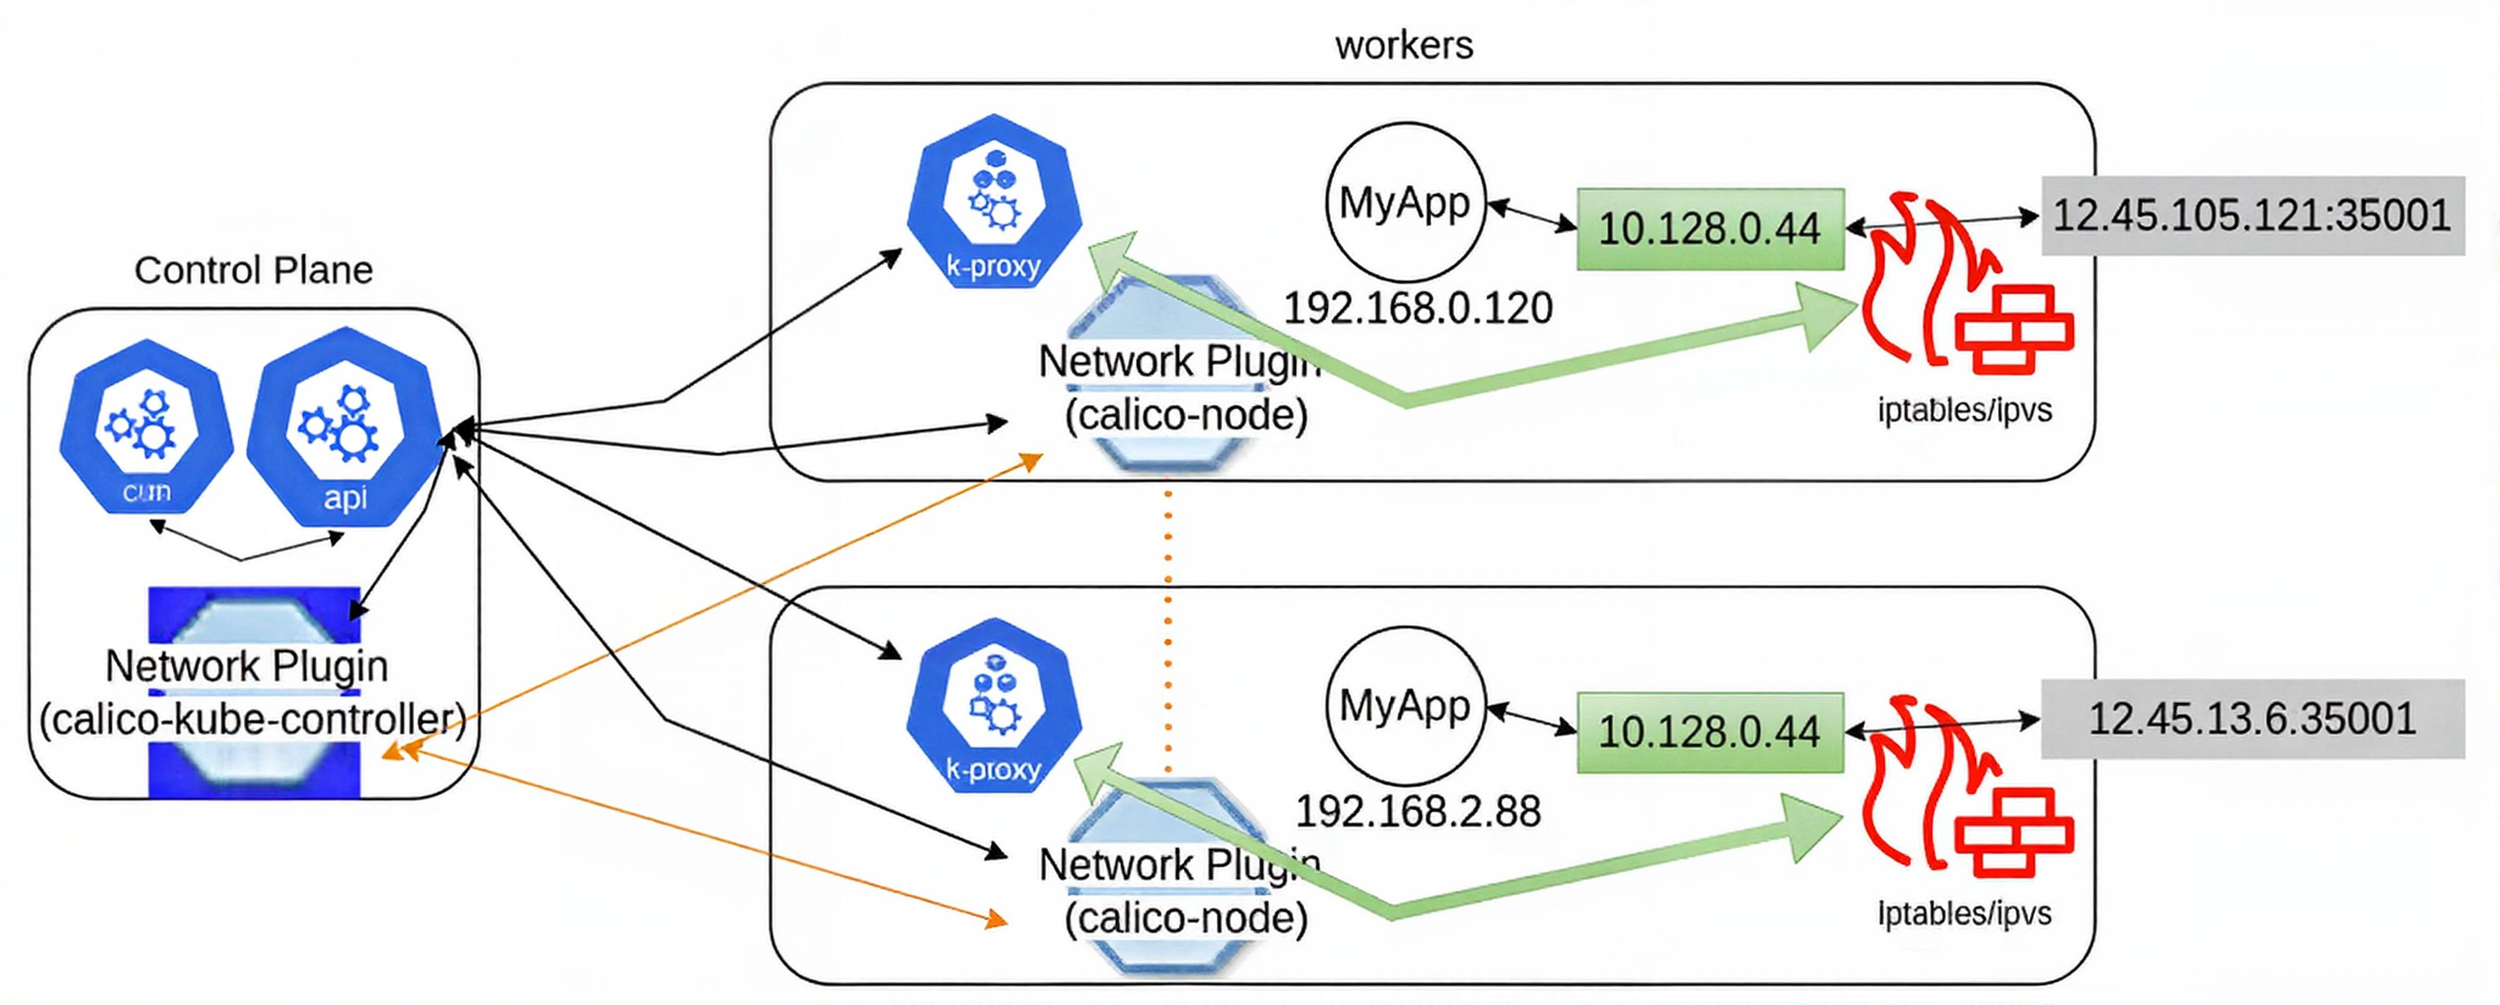
Container to Outside Path
As shown in the diagram, a single, dual-container Pod connects to the outside network through a configured port. This enables external access to the Pod via its shared namespace. Kube-proxy plays a crucial role by routing incoming traffic to the Pod’s IP address, ensuring that external requests reach the correct containers within the Pod. It leverages CNI plugins to manage this process effectively.
CNI plugins like Calico, Flannel, or Cilium handle the underlying network policies that govern external connectivity. For instance, Calico uses BGP to route traffic without encapsulation, while Flannel employs VXLAN to encapsulate packets between nodes. Cilium enhances this with eBPF, providing advanced filtering and security for external traffic. These plugins ensure seamless connectivity across the cluster by mapping external ports to the Pod’s network namespace.
The traffic first arrives at the node hosting the Pod, where the node’s network stack forwards it to the Pod’s IP address. Kube-proxy then directs this traffic to the appropriate container, maintaining consistent communication. This setup allows applications within the Pod to serve external clients reliably, regardless of the cluster’s internal network dynamics.
Service Network
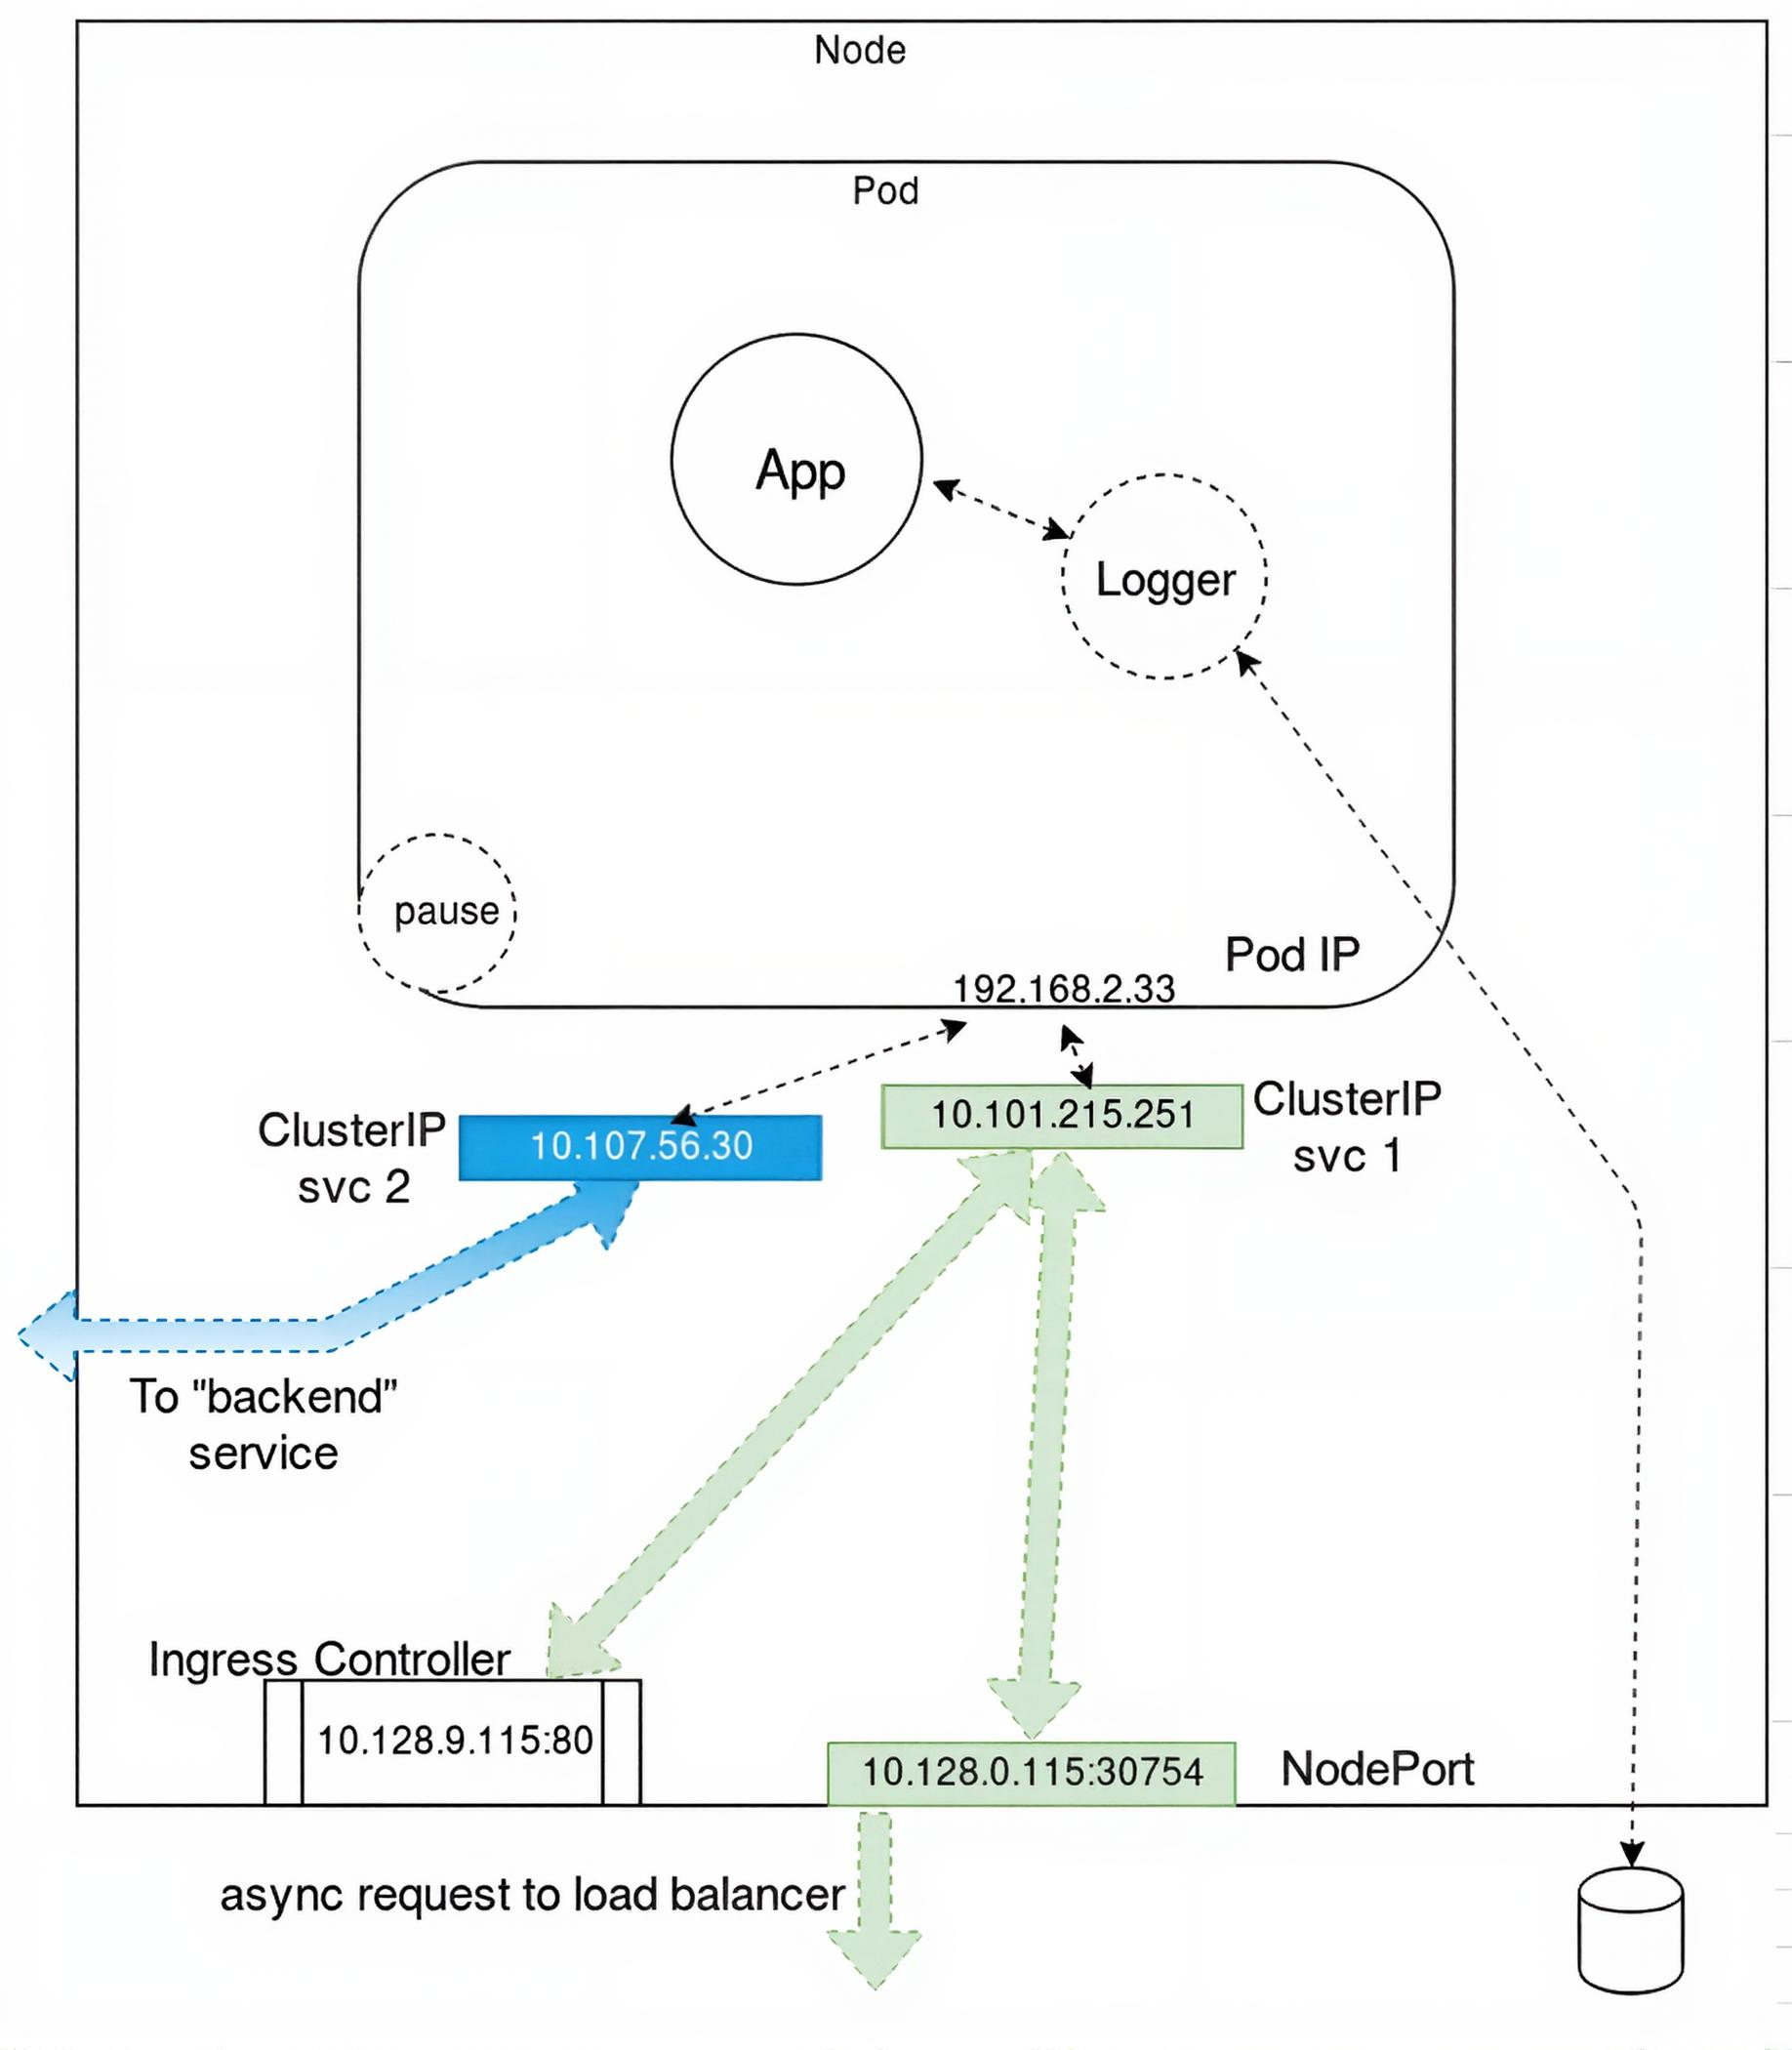
Services provide stable networking for Pods through persistent IPs and label-based routing. They abstract a set of Pods to enable communication within and across namespaces or externally. Kubernetes supports several Service types to accommodate different connectivity needs:
ClusterIP: The default type, providing a stable internal IP for cluster-only access, ideal for Pod-to-Pod communication (e.g., a backend Service accessed by frontend Pods).
NodePort: Exposes the Service on a specific port of each node (default range: 30000–32767), enabling external access for debugging or direct connections.
LoadBalancer: Provisions a cloud provider’s load balancer (e.g., AWS ELB, GCP Cloud Load Balancer) to route external traffic to Pods, suitable for production applications requiring high availability.
ExternalName: Maps a Service to an external DNS name without local proxying, facilitating integration with external services (e.g., an external database).
These Service types provide flexible networking options tailored to application requirements.
As shown in the diagram, a Pod may include a primary container (e.g., App) and an optional sidecar (e.g., Logger). The pause container reserves the IP address in the namespace before other containers start, ensuring network stability. This container, operating at the CRI level, is invisible within Kubernetes, meaning it does not appear in kubectl outputs, but can be inspected using tools like crictl for debugging purposes.
The pause container works closely with the CNI plugin to establish the Pod’s network namespace. It acts as the anchor for the namespace, maintaining the IP address even if other containers restart, which prevents network disruptions. This stability is crucial for applications requiring consistent connectivity, such as those handling persistent client connections.
Within the Pod, the primary container and sidecar communicate through the shared network namespace, using mechanisms like loopback interfaces or inter-process communication (IPC). For example, a Logger sidecar can collect logs from the App container without additional network overhead. This setup ensures efficient intra-Pod communication while the pause container maintains the external-facing IP, enabling seamless interaction with the cluster’s network infrastructure.
Networking Functionality
Kube-proxy routes network traffic to Pod Endpoints using ipvs for efficient connectivity.
An Endpoint object uses the Pod’s IP address and a port for traffic routing. Kube-proxy connects network traffic from a node high-number port to the Endpoint using ipvs, the standard mechanism since Kubernetes 1.22 (2021), which replaced iptables after its deprecation in Kubernetes 1.29 (2024). Kube-controller-manager handles watch-loops to monitor network updates or deletions, ensuring connectivity.
This second part explored Kubernetes’ internal mechanisms—API call flows, watch-loops, and scheduling—alongside its networking, from CNI plugins to container connectivity. It covered Pod IP management, pause container functionality, and traffic routing via kube-proxy. The next part will cover storage, security, and advanced features, providing deeper insights for mastering Kubernetes.
Access from Outside the Cluster
The basic server information, with redacted TLS certificate data for authentication, can be found in the output of the following command:
$ kubectl config view
Config loaded from file /home/student/.kube/config
Without the certificate authority, key, and certificate from this file, only insecure curl commands can be used, which will not expose much due to security settings. Secure API access requires TLS certificates.
~/.kube/config
apiVersion: v1
clusters:
  - cluster:
    certificate-authority-data: LS0tLS1CRUdF.....
    server: https://10.128.0.3:6443
    name: kubernetes
contexts:
  - context:
    cluster: kubernetes
    user: kubernetes-admin
    name: kubernetes-admin@kubernetes
current-context: kubernetes-admin@kubernetes
kind: Config
preferences: {}
users:
  - name: kubernetes-admin
    user:
      client-certificate-data: LS0tLS1CRUdTib.....
      client-key-data: LS0tLS1CRUdTi....
API Objects
Deployment: It is a controller which manages the state of ReplicaSets and the Pods within. The higher-level control allows for more flexibility with upgrades and administration. Unless you have a good reason, use a Deployment.
ReplicaSet: Orchestrates individual Pod lifecycle and updates. These are newer versions of Replication Controllers, which differ only in selector support.
Pod: It is the lowest unit we can manage; it runs the application container, and possibly support containers.
DaemonSets: Should you want to have a logging application on every node, a DaemonSet may be a good choice. The controller ensures that a single Pod, of the same type, runs on every node in the cluster. When a new node is added to the cluster, a Pod, same as deployed on the other nodes, is started. When the node is removed, the DaemonSet makes sure the local Pod is deleted. DaemonSets are often used for logging, metrics, and security Pods, and can be configured to avoid nodes.
StatefulSets: According to Kubernetes documentation, a StatefulSet is the workload API object used to manage stateful applications. Pods deployed using a StatefulSet use the same PodSpec. How this is different than a Deployment is that a StatefulSet considers each Pod as unique and provides ordering to Pod deployment. In order to track each Pod as a unique object, the controller uses an identity composed of stable storage, stable network identity, and an ordinal. This identity remains with the node, regardless of which node the Pod is running on at any one time. The default deployment scheme is sequential, starting with 0, such as app-0, app-1, app-2 in this example. A following Pod will not launch until the current Pod reaches a running and ready state. They are not deployed in parallel.
Deployment Configuration Spec: There are two spec declarations for the Deployment. The first will modify the ReplicaSet created, while the second will pass along the Pod configuration.
spec:
    progressDeadlineSeconds: 600
    replicas: 1
    revisionHistoryLimit: 10
    selector:
        matchLabels:
            app: dev-web
        strategy:
            rollingUpdate:
                maxSurge: 25%
                maxUnavailable: 25%
                type: RollingUpdate
$ kubectl scale deploy/dev-web --replicas=4
These configurations enable precise scaling and updates for containerized workloads. Kubernetes' internal mechanisms and networking ensure robust orchestration across dynamic clusters. Fine-tuning these processes optimizes application performance and reliability.
Kubernetes orchestrates dynamic workloads through precise API-driven mechanisms and resilient networking. These processes enable seamless scaling and connectivity for modern applications. Deep understanding of these internals empowers efficient cluster management.
Made by a Human